How to buy a diamond comes down to a few steps in order: set a budget, choose a shape, put cut ahead of color, clarity and carat weight, and decide between natural and lab-grown. Before you approve any stone, read its GIA report and look at it on video. If you're doing this for the first time, you're probably spending more on one object than you ever have, on something you can't fully evaluate with your own eyes. That combination makes people anxious, and anxious buyers get talked into things.
This guide follows the order I use with clients, from the budget conversation to the moment you approve a stone. I'm GIA-credentialed in diamonds and gemstones, and I spent years as a Territory Manager for a diamond and gemstone manufacturer before I started working directly with clients. Everything below is what I'd tell you across a kitchen table.
Step 1: Set a budget you're comfortable saying out loud
There is no correct amount to spend on an engagement ring. The right number is the one that lets you enjoy the ring and doesn't follow you around afterward.
A few things make the number more useful:
- Decide whether it's the stone or the whole ring. The setting, metal and any side stones come out of the same total. Say which one you mean.
- Give a range, not a ceiling you're secretly hoping to beat. A range lets a jeweler show you the trade-offs on either side.
- Tell the jeweler the real number. A good one will show you the best version of that number, including where spending more buys nothing anyone will notice. If you feel judged for your budget, that's information about the jeweler, not about you.
Step 2: Choose a shape, then check the ratio
Shape is the most personal decision and the one to make first, because it changes how you'll judge everything else. Round, oval, emerald, pear, cushion, radiant and marquise all behave differently.
Two stones of the same carat weight can look very different in size. Elongated shapes such as ovals, pears and marquises spread their weight across a longer outline, so they often look larger face-up than a round of the same weight. Step cuts like emeralds show a cleaner, more open view into the stone, which also means they show more of what's inside.
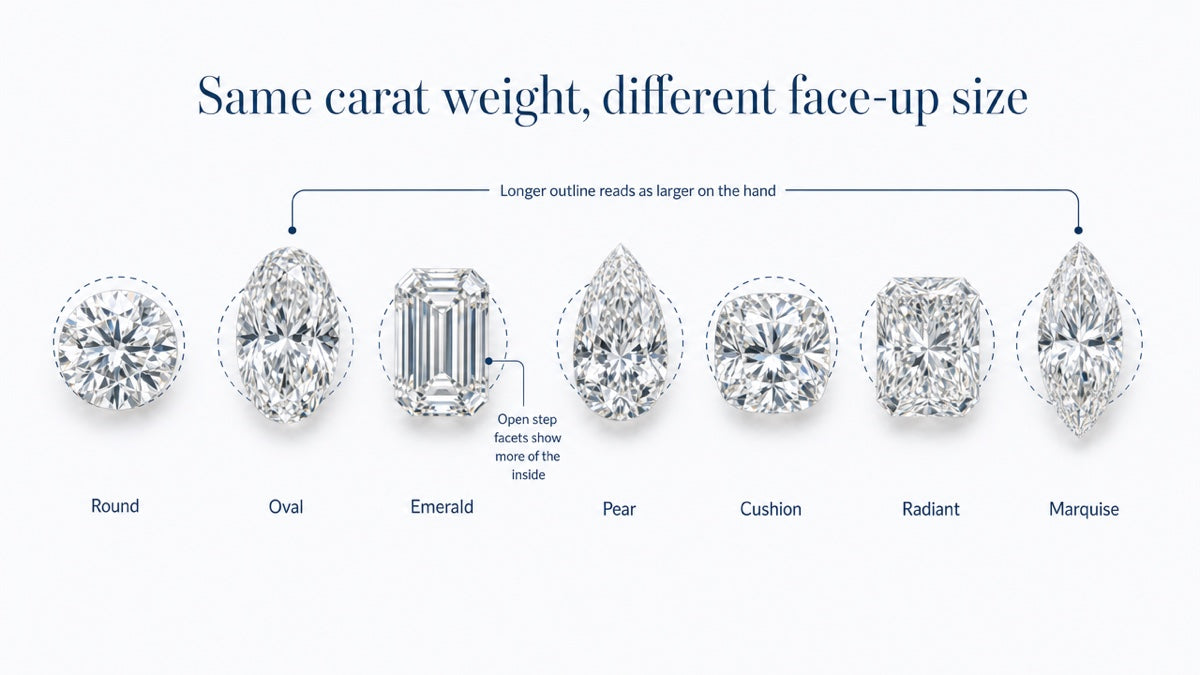
For fancy shapes, ask about the length-to-width ratio, which describes the stone's length relative to a width of 1. Emerald cuts, rectangular cushions and pears tend to be most popular between 1.50:1 and 1.75:1. Go too long and narrow and the stone becomes more prone to breaking. Go too short with an oval and it can look like a lopsided round.
When you look at a fancy shape, check that both sides of the outline mirror each other, that curves are smooth and full without flat spots, and that the shape is clearly defined. A heart should have a crisp cleft. A pear should have a point that lines up with its rounded end.
Step 3: Put cut first
The 4Cs (cut, color, clarity and carat weight) were coined by GIA's founder, Robert M. Shipley, and they're still the shared language for diamond quality. If you're going to prioritize one, prioritize cut.
Cut is the proportion, shape and arrangement of facets that determine how a diamond returns light: its brightness, sparkle and fire. It's an evaluation of the cutter's skill, and it can have the greatest effect on how beautiful the stone looks. A well-cut stone with modest color and clarity grades will often look better than a poorly cut stone with impressive ones.
Round diamonds receive a GIA cut grade on a scale from Excellent down to Poor. For a round, I'd treat Excellent or Very Good as the starting point and adjust other grades around it.
Fancy shapes don't receive a GIA cut grade, because there are too many shapes and cutting styles to grade on one scale. The report still lists polish and symmetry, which help, but judging a fancy shape's cut means looking at the stone itself, which is why the video in Step 9 matters so much. With ovals, pears and marquises, look for a "bow-tie": a dark band across the middle. Some bow-tie is normal in these shapes; a heavy one that stays dark as the stone moves is a cut problem.
Step 4: Color and clarity, judged by what you'll see
Color
GIA grades color on a D-to-Z scale, from colorless to increasingly yellow or brown. The ranges are grouped as colorless (D to F), near colorless (G to J), faint (K to M), very light (N to R) and light (S to Z).
The differences between neighboring grades are subtle and usually only visible side by side under controlled lighting. Your metal choice matters too. Yellow gold reflects warmth into a diamond, so a stone in the near-colorless range can look perfectly at home there. White gold and platinum are less forgiving, so if you want a bright, icy look in white metal, color deserves a little more of the budget.
Clarity
Clarity describes the amount, size and location of inclusions (internal characteristics) and blemishes (surface ones). The GIA scale runs from Flawless down to I3. Flawless means a skilled grader sees no imperfections inside or out at 10x magnification. Grades are based on the number, size, relief and position of what's visible at that 10x standard.
Most diamonds have inclusions visible at 10x: tiny crystals and structural irregularities formed as the diamond grew. In a natural stone, they're part of its record of growth.
The practical goal for most buyers is an eye-clean stone, meaning nothing distracting is visible at a normal viewing distance. Where an inclusion sits matters as much as the grade. A small dark crystal under the center of the table is more noticeable than a lighter one near the edge, where a prong might cover it. Step cuts like emeralds show inclusions more readily than brilliant cuts, so they often need a higher clarity grade to look clean.
Step 5: Carat weight and the magic numbers
Carat is weight, not size. How big a stone looks depends on its shape and how its weight is distributed. A stone cut too deep carries weight you can't see from the top, and that's another reason cut comes first.
Per-carat prices generally jump at "magic weights" such as 1.00, 1.50 and 2.00 carats. A 0.95 carat diamond costs less per carat than a 1.00 carat stone and looks almost the same. If a round number isn't important to you, shopping just under it is one of the most reliable ways to make a budget go further.
Step 6: Natural or lab-grown
Both are real diamonds. Lab-grown diamonds are grown in a controlled environment rather than formed in the earth. GIA has graded them since 2007, and its reports for lab-grown stones state the growth process (CVD or HPHT) and whether there's evidence of post-growth color treatment. Since 2019, GIA has used "laboratory-grown" rather than "synthetic." Natural and lab-grown diamonds can be hard to tell apart, so any lab-grown stone should be clearly labeled as such. Moissanite, by contrast, may look like a diamond but is a different material.
The differences that matter for your decision:
- Cost. For a similar size and quality, lab-grown generally costs less. Many people use the difference for a larger stone or a better setting.
- Resale and long-term value. Natural diamonds have a longer resale market, though resale for any diamond is typically well below what you paid. The resale market for lab-grown diamonds is newer, smaller and less predictable, and lab-grown stones often resell for very little.
- Origin. Some people care deeply about a stone formed over geological time; others care more about size or sourcing. Neither answer is wrong.
I offer both, and I'll walk through the trade-offs for your specific budget without pushing you toward either. If you're unsure, you don't need to decide before we talk.
Step 7: Fluorescence, in perspective
Fluorescence is a glow some diamonds give off under ultraviolet light. Roughly 25 to 35 percent of diamonds submitted to GIA show some, and in more than 95 percent of those the glow is blue. Only about 10 percent of fluorescent diamonds fluoresce strongly enough to affect appearance, and fewer than 0.2 percent look hazy or oily, an effect linked to strong fluorescence combined with tiny inclusions.
Faint to medium fluorescence is usually unnoticeable. Strong to very strong fluorescence may look milky in sunlight in some stones. Fluorescent diamonds sometimes cost slightly less, so it isn't automatically a flaw. Every GIA Diamond Grading Report lists fluorescence. If a stone you like is marked strong or very strong, ask to see it in more than one kind of light before you decide.
Step 8: Read the GIA report before you approve anything
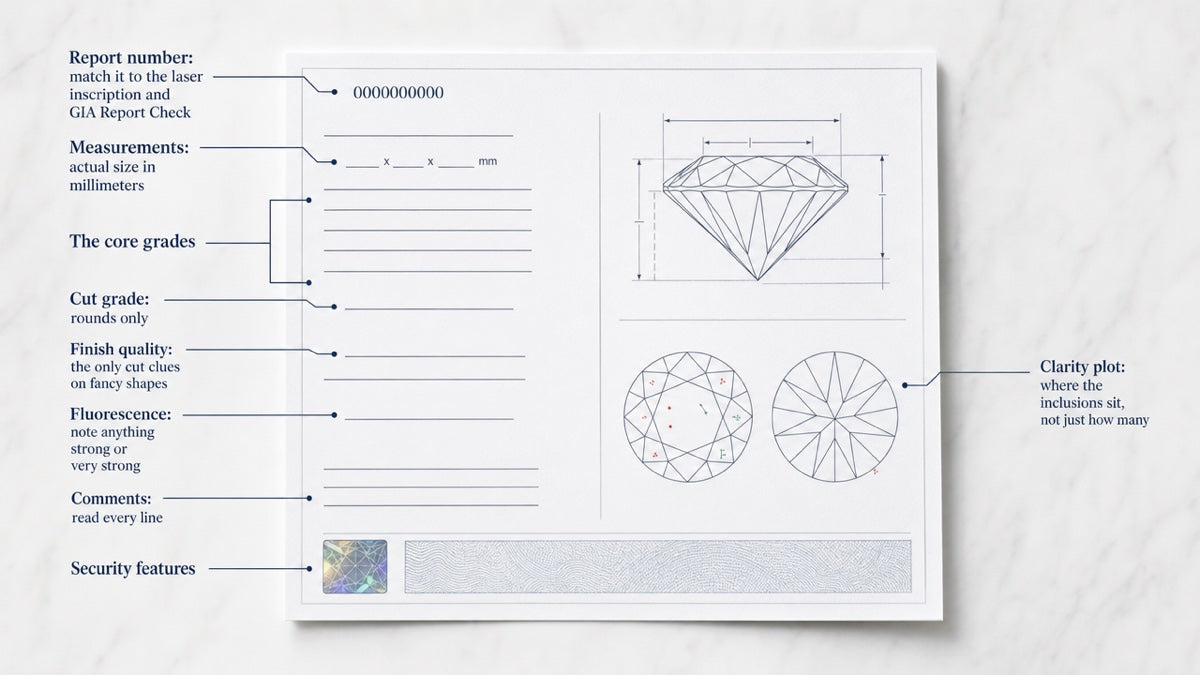
Any diamond you buy should come with a grading report that includes, at minimum, color and clarity grades and a carat weight. A GIA report typically lists shape and cutting style, measurements, carat weight, color, clarity, cut grade (for rounds), polish, symmetry, fluorescence and any known treatments, plus a plotted diagram of inclusions and blemishes.
How to read it usefully:
- Check the measurements, not just the carat weight. Two 1.00 carat stones can differ in face-up size.
- Look at the clarity plot. It shows where inclusions sit. Centered ones matter more.
- Read the comments. Notes there can explain characteristics not shown on the plot.
- Confirm it's genuine. GIA reports carry a hologram, a security screen and microprint lines, and GIA's Report Check service confirms that a report matches GIA's database. Many stones are also laser-inscribed with the report number on the girdle, which helps identify the stone if it's ever lost or stolen.
Every center stone I place is GIA certified, and you see its report before you say yes, not after it's set.
Step 9: Watch the diamond video like a jeweler
A still photo flattens a diamond. Video shows what you actually care about: how the stone handles light as it moves.
Remember the magnification. Diamond videos are often filmed much closer than the 10x standard used for clarity grading. At that zoom, an inclusion can look alarming and still be invisible on the hand. Compare what you see to the clarity plot, then ask how it looks at normal viewing distance.
Watch for:
- Sparkle across the whole stone. Light should flash from edge to center, not just in patches.
- Dark zones that stay dark. A bow-tie that flickers as the stone turns is normal; one that never lightens is not.
- The outline. For fancy shapes, check symmetry and curves against Step 2.
- Color in context. Studio lighting can make color look better or worse than real life. Ask to see the stone next to a white surface or another stone.
Confirm the video, the report and the stone all belong together. The report number should match the inscription, and your paperwork should record what the seller told you: origin, weight and any treatments.
When I'm working with clients remotely, I send video of the stones at each stage, so you're judging the actual diamond you'll wear.
Step 10: Let the setting do some of the work
The setting changes how a diamond looks and how well it's protected, which affects where you can save on grades.
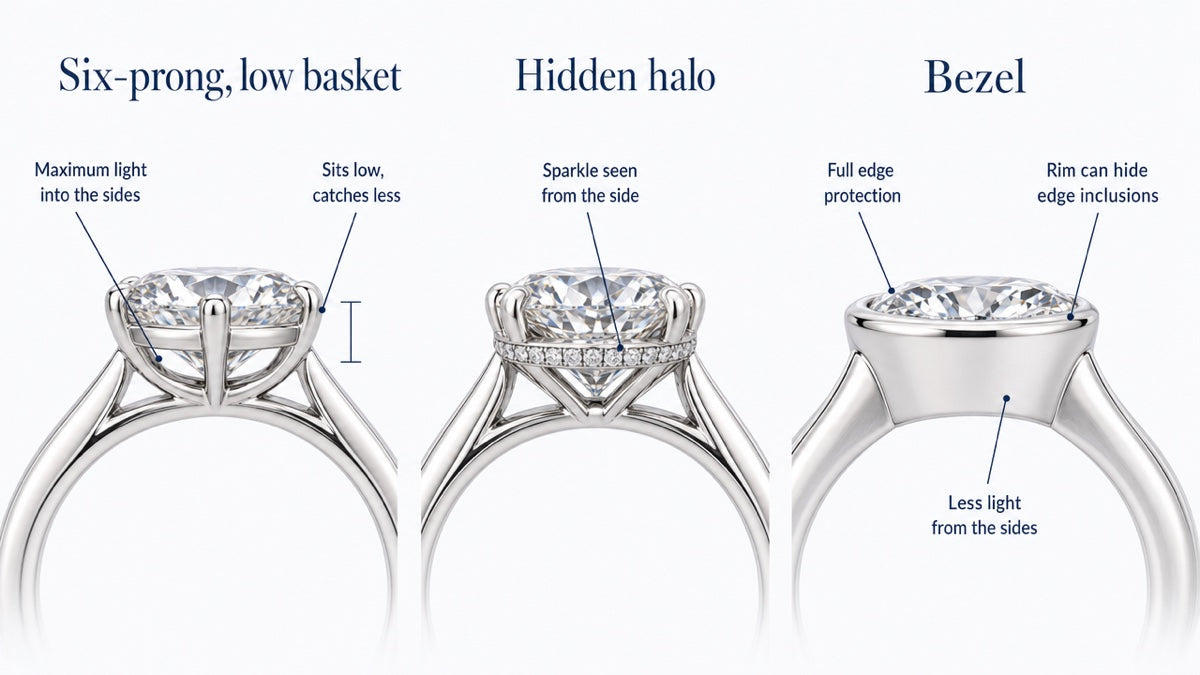
- Halos surround the center stone with smaller diamonds and can make it look larger. Hidden halos sit below the stone and add sparkle from the side.
- Bezels wrap the stone's edge in metal. They're very protective and can hide minor inclusions near the girdle, though they let in less light from the sides.
- Prong count: six prongs offer more security; four show more of the diamond.
- Basket height: a low-set stone catches less on sweaters and doorframes; a higher setting can show off the stone and leave room for a band beneath.
Prongs and bezels can cover edge inclusions, and yellow gold can mask a slightly warmer color. Decide the setting before you lock in grades.
Questions to ask any jeweler
GIA suggests asking a jeweler to explain the 4Cs with real stones and to show you diamonds within your budget so you can compare value. I'd add:
- Can I see the full GIA report before I approve the stone?
- Can you send video of this exact diamond, and how magnified is it?
- Where are the inclusions, and will any be visible once it's set?
- How would this compare to a stone one color or clarity grade lower?
- Is the report number laser-inscribed?
- What does my paperwork state about origin, weight and treatments?
- Does the piece come with an appraisal for insurance?
- What happens if I want to change something before it's made?
A jeweler who welcomes these questions is one you can trust with the rest.
After you buy: appraisal and insurance basics
A grading report and an appraisal are different documents. The report describes the stone's quality. The appraisal assigns a value, typically for insurance and after-purchase care. Neither replaces the other. GIA doesn't perform appraisals; appraisals come from appraisers, and national appraisal associations often require a GIA Graduate Gemologist diploma plus additional appraisal training.
Most insurers will ask for an appraisal before covering a ring, and it's also useful later for upgrades or resale. Insure the ring before you wear it out of the house, and ask your insurer whether coverage includes loss, theft and damage. This is general information, so for coverage or valuation questions, talk to your insurer or a qualified appraiser.
Every custom piece I make arrives with a detailed appraisal in the box, so you can insure it the day it arrives.
How this works with me
My custom process follows these steps in order. We start with a complimentary consultation, in Austin or over video. Within about two weeks I source GIA certified stones inside your budget and show you each one with its report, its video and its trade-offs. Then you approve renderings, and nothing is made until you do. Production takes four to six weeks from design approval. If you'd rather start from an existing design, browse the engagement rings in the shop, and every piece there can be adapted.
You don't need to know shape names or have chosen natural or lab-grown. Bring your saved pictures and a rough number. Tell me what you're imagining, and I'll reply within 24 hours with what's possible.