To design a custom engagement ring, you need a few saved pictures and a rough idea of what you want to spend, not a design degree. Knowing how to design a custom engagement ring is mostly about bringing those two things; the skill comes in later, when someone turns your pictures into a stone, a setting and a finished ring that fits.
I'm Karmen. I'm GIA-credentialed in diamonds and gemstones and an Accredited Jewelry Professional, and I spent years as a Territory Manager for a diamond and gemstone manufacturer before starting KLA. This page walks through exactly how a custom ring comes together with me, what you decide at each stage, and where your decisions get harder to undo.
Who you're working with
Many custom ring services pass you between a salesperson, a designer and a production team. Here, it's me the whole way. I answer your messages, source your stone, review the design, inspect the finished ring and send it to you.
That matters most when something needs a judgment call: a stone that looks better in person than on paper, a setting detail that won't wear well, or a budget question. You get one answer from the person who is accountable for the result.
Before we talk: what to bring
Pictures, as many as you like
Screenshots, saved posts, a ring you photographed on someone's hand, a necklace you liked in a store. They don't all need to agree with each other. When I see what someone keeps saving, I usually learn more than I would from any description. A few words about what you love in each one ("this band, that stone shape") help too.
A budget number, even a rough one
Say it out loud and I'll show you the best version of that number. I'll also tell you where spending more would change nothing anyone can see. A range works fine. Leave a little room for ring insurance and any engraving, because those sit outside the ring itself.
The ring size, if you can get it
Knowing the size before design starts is worth the effort. It affects how the band is built and how easily the ring can be adjusted later. If it's a surprise, here are some quiet ways to find it:
- Borrow a ring the wearer already wears on the same finger, and have a jeweler measure it. You can also trace its inside edge on paper.
- Ask a close friend or family member who might know, or who can find out without raising suspicion.
- Remember that wider bands tend to fit more snugly than thin ones. A size taken from a delicate ring may need to go up slightly for a wider band.
If you can't get a size at all, we can work around it. Sizing is complimentary.
What you can leave at home
You don't need to know stone shapes or setting names, choose between natural and lab-grown, or be ready to buy anything. Working those things out is what the first conversation is for.
Step 1: The consultation
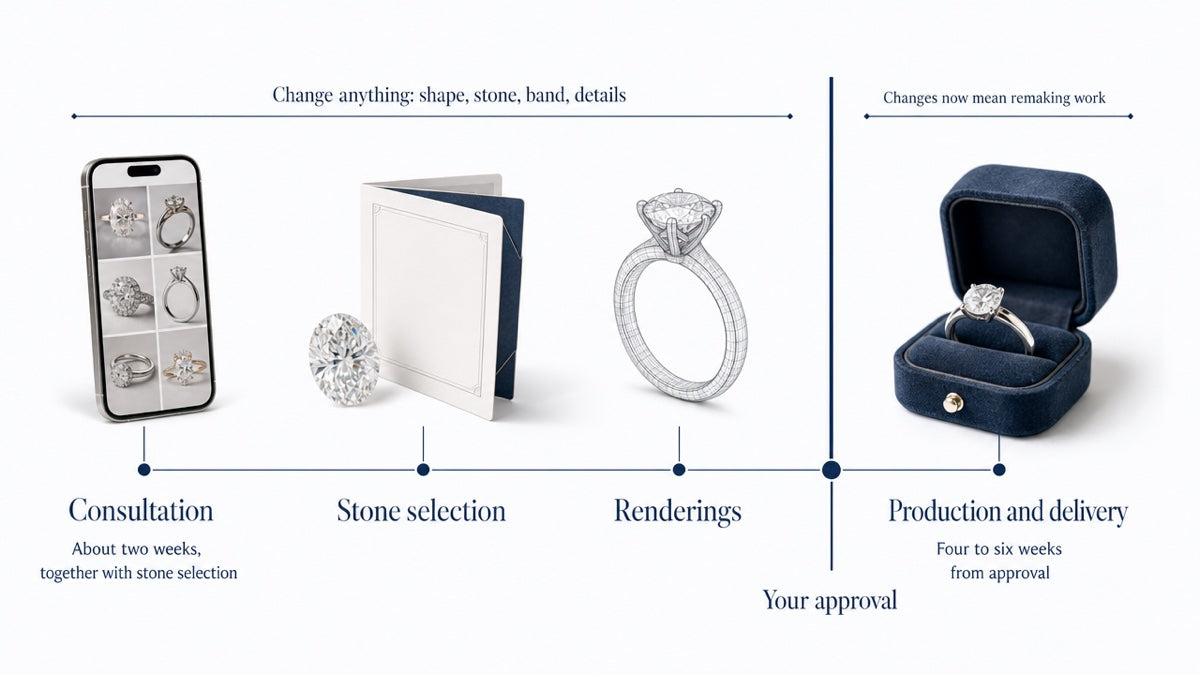
Consultations are complimentary and carry no obligation. We can meet in person in Austin by appointment, or talk over video from anywhere. Most of my out-of-town clients never meet me in person. They see renderings and videos of their stones at every stage, so nothing is left to guesswork. Getting on the calendar usually takes about a week.
We'll go through your pictures and narrow down the things you keep coming back to. That might be a solitaire, a hidden halo, a three-stone, a bezel, an east-west setting or something vintage. We'll also settle on a stone shape: round, oval, emerald, pear, cushion, radiant, marquise or something else. I'll ask who the ring is for, whether it's a surprise, and whether you're working toward a date.
Step 2: Choosing the stone
Next, I source GIA certified options inside your budget and show you each one. I'll explain the trade-offs plainly: why one stone faces up larger, why another costs more for a difference you'd only see under magnification.
Every center stone comes with its GIA grading report, and you review it before you approve the stone. GIA is an independent nonprofit that doesn't buy or sell diamonds, and it developed the 4Cs (color, clarity, cut and carat weight) that the trade uses to grade them. The report describes those qualities, confirms whether the diamond formed naturally, and discloses any treatments. That is why I want you reading it before you say yes, not after.
Natural or lab-grown
I work with both. I'll lay out how they differ in cost, resale and sourcing, and then the choice is yours. Many clients who choose lab-grown put the difference toward a larger stone or a better setting. Others want a natural stone and adjust size or grade to fit the budget. Neither choice is a mistake as long as you know what you're choosing.
Using stones you already own
Heirloom redesign is some of my favorite work. This might be a grandmother's diamond in a new setting, or a parent's band reworked into something you'll actually wear. Bring the piece, and I'll tell you honestly what can be reset and what should be left alone.
A few things are worth knowing before you get attached to a plan:
- Older stones carry their history. Chips, abrasion on facet edges and wear from decades of daily life are common, and some damage only shows once a stone is out of its setting. Some stones are better off left alone.
- An unreported stone is an unknown. Without a grading report, its exact grades and any past treatments haven't been documented. That doesn't make it any less meaningful. It does mean we should talk about it plainly.
- Old metal and settings may be tired. Thin prongs and worn shanks are fine to keep as sentiment, but they may not be the right structure for a ring worn every day.
Step 3: Renderings and revisions
Once the stone is chosen, you see CAD renderings of your ring from every angle. This is the stage to be picky. Tell me if the band looks too wide, the stone sits too high or the prongs feel heavy. We adjust and look again until it's right.
Changing your mind here costs you nothing except a little time. Nothing goes into production until you give a clear yes on the renderings. After that, the ring starts becoming physical metal, and changes are no longer a matter of redrawing. If you're unsure about something, raise it before you approve. I would rather do one more round of renderings than have you wonder later.
Design choices that affect sizing later
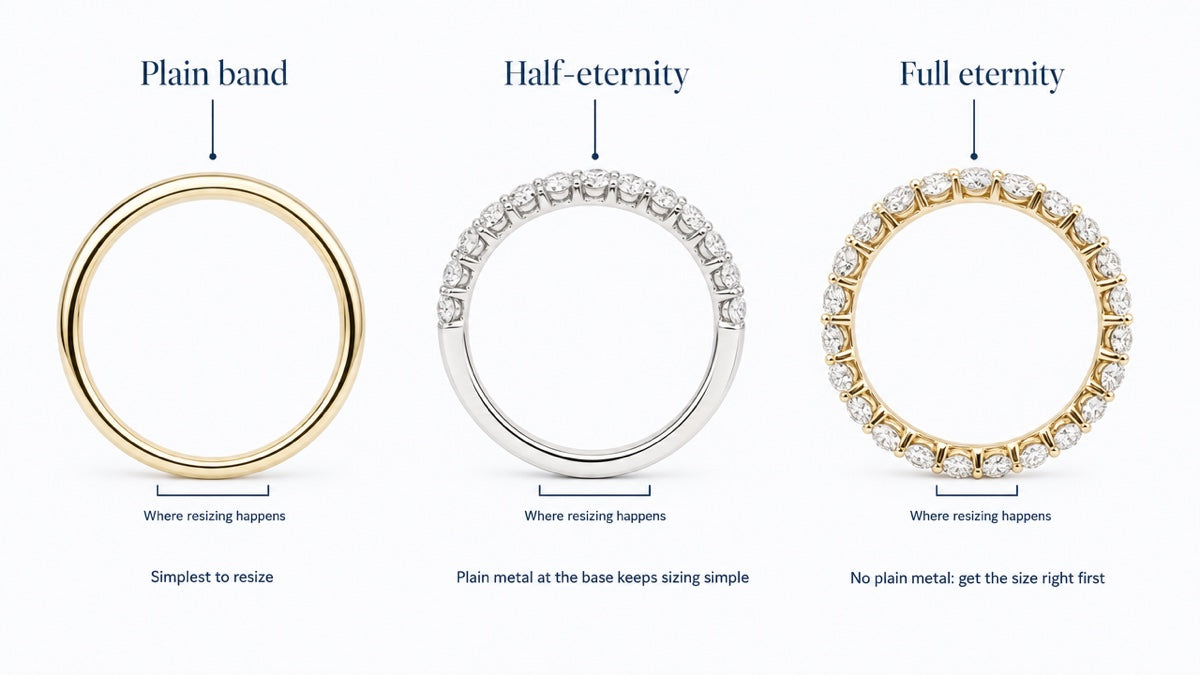
This part often gets left until it's too late, so we talk about it before the CAD stage. A plain metal band is the easiest to resize. As a general rule, rings can be adjusted about two sizes up or down. Stones around the band make it more complicated:
- Full eternity bands, with stones all the way around, leave no plain metal to work with. Resizing is very limited, so the size needs to be right from the start.
- Pavé and channel-set bands with small accent diamonds can be resized, but the work is more delicate. Accent stones near the adjustment point may need attention.
- Half-eternity and partial pavé, with stones across the top only, leave plain metal underneath. That keeps future sizing much simpler.
If you have a confident size, choose the band you love. If you're guessing for a surprise, a design with plain metal at the base gives you flexibility.
How your budget shapes the design
Budget doesn't only decide how big the center stone is. It's a balancing act across the whole ring, and I'll show you the options openly:
- The center stone is usually the largest share. Small differences in grade can change the price a lot without changing what anyone sees across a room. I'll point out where those differences are.
- Natural versus lab-grown changes the cost of a given size and grade substantially, which frees up money for elsewhere.
- The setting's complexity counts too. A halo, pavé band or detailed gallery adds stones and labor. A clean solitaire puts everything into the center stone.
- Metal choice and band width affect how much material goes into the ring.
Tell me which matters most to you: size, sparkle, a particular detail, or staying well under a number. I'll design toward that. If what you want isn't realistic at your budget, I'll say so, and if I'm not the right jeweler for the project, I'll tell you that too.
Step 4: Making and delivery
After you approve the design, your ring is made, set and inspected. I film it before it leaves so you can see it move in the light, which a still photo can't show. Production takes four to six weeks from design approval.
It then arrives hand-delivered or by complimentary, fully insured shipping. Austin-area clients can also collect in person. A detailed appraisal for insurance comes in the box with the ring, not by email weeks later. Insuring an engagement ring is widely recommended, and the GIA report and appraisal together give an insurer what it typically asks for. This is general information, though, so check with your insurer or a qualified professional about what your policy requires.
If the size isn't right, sizing is complimentary. Send the ring back and I'll have it corrected. After that, bring it to me twice a year and I'll check the prongs at no charge.
The timeline, honestly
Plan on about two weeks for the consultation and stone selection. Then allow four to six weeks from design approval, so six to eight weeks in total. Extra rounds of revisions add time at the rendering stage, and that time is well spent.
If you have a proposal date, tell me at the very start. People sometimes settle on a design only to find it can't arrive in time. I'd rather tell you on day one whether your date is realistic.
Ready to start?
It takes four questions and your name, under two minutes. Skip anything you haven't decided. I read every request myself and reply within 24 hours with what's possible at your budget. You can start your ring here, browse finished client pieces in the portfolio, or read what working together was like in client reviews.